Arduino – Node Red – MCP42010 – Sample control of the digital potentiometer
In the article Arduino – control and test digital potentiometer MCP42010 on a breadboard I showed how the MCP42010 can be controlled via the serial monitor of the Arduino IDE.
Now I want to do this more comfortably.
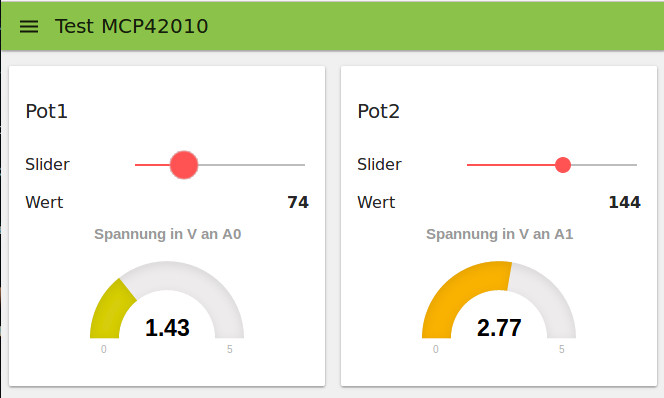
The operation has to take place from the browser, should look visually very appealing and it must also be possible with the smartphone.
Why with Node Red?
Node Red is included in the standard installation of the Raspberry Pi, free and intuitive to use.
By the possibility of clicking together the flow by drag and drop together, one comes very quickly to a good result.
For prototypes and also IOT applications this is a really great thing.
Where light is, is also shadow: Node Red consumes quite a lot of resources.
Nevertheless, the Raspberry Pi 2 does well and the performance with the Pi 3 should still much better.
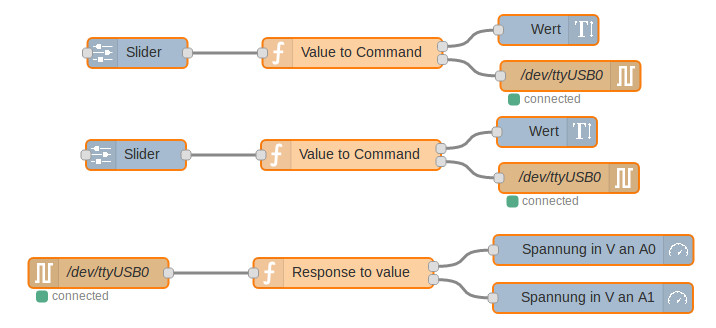
Required functions of the flow
The flow is supposed to take over the entries, which I have done by hand in the Arduino – control and test digital potentiometer MCP42010 on a breadboard.
The flow should represent the return values in a Gauge Chart.
data input:
1:Value between 0-255 -> sets potentiometer1 to the value and returns the voltage to A0
2:Value between 0-255 -> sets potentiometer2 to the value and returns the voltage to A1
The Flow
- copy the following flow and insert it under menu (top right) -> Import – Clipboard
[{"id":"ebf0e947.110038","type":"ui_slider","z":"8ec3bd3.cce4dc","tab":"147200e2.b8e19f","name":"Slider","topic":"","group":"Pot1","order":1,"min":0,"max":"255","x":225.5,"y":125,"wires":[["25bd2695.9acaf2"]]},{"id":"b755b484.2bd75","type":"ui_text","z":"8ec3bd3.cce4dc","tab":"147200e2.b8e19f","name":"Wert","group":"Pot1","order":1,"format":"{{msg.payload}}","x":636.5,"y":102,"wires":[]},{"id":"ed9f01b2.dfae38","type":"ui_gauge","z":"8ec3bd3.cce4dc","tab":"147200e2.b8e19f","name":"Spannung in V an A0","group":"Pot1","order":1,"format":"{{value}}","min":0,"max":"5","x":681.5,"y":322,"wires":[]},{"id":"25bd2695.9acaf2","type":"function","z":"8ec3bd3.cce4dc","name":"Value to Command","func":"var msg1 = { payload:\"1:\" + msg.payload +\"\\n\"};\nreturn [msg, msg1];","outputs":"2","noerr":0,"x":440.5,"y":125,"wires":[["b755b484.2bd75"],["134514.6c0042ed"]]},{"id":"134514.6c0042ed","type":"serial out","z":"8ec3bd3.cce4dc","name":"/dev/ttyUSB0","serial":"d535ccdc.123838","x":658.5,"y":148,"wires":[]},{"id":"13db30d1.da3c67","type":"serial in","z":"8ec3bd3.cce4dc","name":"/dev/ttyUSB0","serial":"43aa993f.185738","x":186.5,"y":345,"wires":[["f39416bc.0495"]]},{"id":"f39416bc.0495","type":"function","z":"8ec3bd3.cce4dc","name":"Response to value","func":"//find A0 or A1\nvar value;\nif (msg.payload.indexOf(\"A0\") != -1) {\n value = msg.payload.split(\"A0: \");\n value = value[1].replace(\" Volt\", \"\");\n msg.payload = value;\n return [msg, null];\n} else {\n value = msg.payload.split(\"A1: \");\n value = value[1].replace(\" Volt\", \"\");\n msg.payload = value;\n return [null , msg];\n}","outputs":"2","noerr":0,"x":431.5,"y":345,"wires":[["ed9f01b2.dfae38"],["ddbfff6.2bdb3"]]},{"id":"8a48ef7d.33ba9","type":"ui_slider","z":"8ec3bd3.cce4dc","tab":"147200e2.b8e19f","name":"Slider","topic":"","group":"Pot2","order":1,"min":0,"max":"255","x":224,"y":227,"wires":[["127d632d.c0419d"]]},{"id":"5a58be54.e6b8d8","type":"ui_text","z":"8ec3bd3.cce4dc","tab":"147200e2.b8e19f","name":"Wert","group":"Pot2","order":1,"format":"{{msg.payload}}","x":635,"y":204,"wires":[]},{"id":"127d632d.c0419d","type":"function","z":"8ec3bd3.cce4dc","name":"Value to Command","func":"var msg1 = { payload:\"2:\" + msg.payload +\"\\n\"};\nreturn [msg, msg1];","outputs":"2","noerr":0,"x":439,"y":227,"wires":[["5a58be54.e6b8d8"],["ee1b0407.9fbca"]]},{"id":"ee1b0407.9fbca","type":"serial out","z":"8ec3bd3.cce4dc","name":"/dev/ttyUSB0","serial":"43aa993f.185738","x":657,"y":250,"wires":[]},{"id":"ddbfff6.2bdb3","type":"ui_gauge","z":"8ec3bd3.cce4dc","tab":"147200e2.b8e19f","name":"Spannung in V an A1","group":"Pot2","order":1,"format":"{{value}}","min":0,"max":"5","x":681,"y":370,"wires":[]},{"id":"147200e2.b8e19f","type":"ui_tab","z":"","name":"Test MCP42010","icon":"dashboard","order":"1"},{"id":"d535ccdc.123838","type":"serial-port","z":"","serialport":"/dev/ttyUSB0","serialbaud":"9600","databits":"8","parity":"none","stopbits":"1","newline":"\\n","bin":"false","out":"char","addchar":false},{"id":"43aa993f.185738","type":"serial-port","z":"","serialport":"/dev/ttyUSB0","serialbaud":"9600","databits":"8","parity":"none","stopbits":"1","newline":"\\n","bin":"false","out":"char","addchar":false}]